Managing Patient Details
The Clients menu in the main Navigation Bar allows you to search for and edit existing patient details, create a new patient, and blacklist or group patients together.
How do I find an existing patient?
To find existing patient details, you can either:
- search for the patient from the Dashboard in the Client search section
- search for the patient within the Clients Navigation Bar option
Option 1: Search using the Dashboard
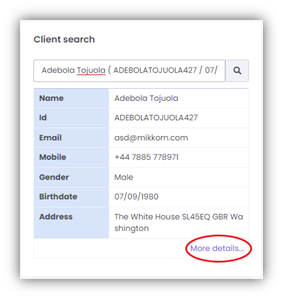
From the Dashboard, search for your patient using the Client search as demonstrated in the
Dashboard section.
From the list of patient names returned, select your patient; a summary of their contact details will be displayed. Select More details to be taken to the Client details screen.
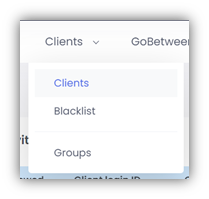
Option 2: Search from within Clients
Using the Navigation Bar, select
Clients > Clients.
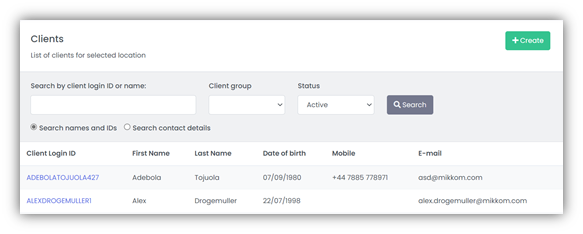
A list of existing patients will be displayed, 20 at a time in alphabetical order. Click Show More at the bottom of the screen to view the next 20.
If you cannot see your patient details listed, you can search for them via their Client Login ID or Name.
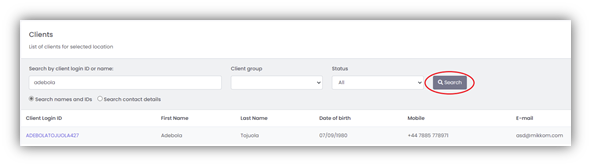
A minimum of 3 characters are required prior to selecting Search. Further search options allow you to narrow your search by Client group or Status (All, Active or Archived).
Archived patients are those who have not attended an appointment in the past 6 months and do not have an appointment booked in the future.
When you are satisfied that you have the correct patient, select your patient by clicking on their Client Login ID, this will take you to the Client details screen.
Client Details Screen
The Client details screen consists of several tabs which allow you to view the Client Account information, Booking records, Client notes, GoBetween Messages and Surveys, PDF forms that have been assigned to them, as well as any Additional user data.
The number of tabs visible will differ depending on how mCB is configured for each organisation.
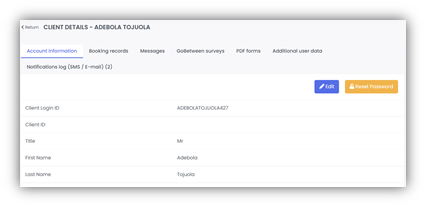
Account information
From this tab, you can view the basic data associated with this client, such as Login ID, first and last name, gender, etc. It also contains system specific data, such as which locations they have had appointments at, if they have been blacklisted, as well as any custom data fields specified by the administrators.
Booking records
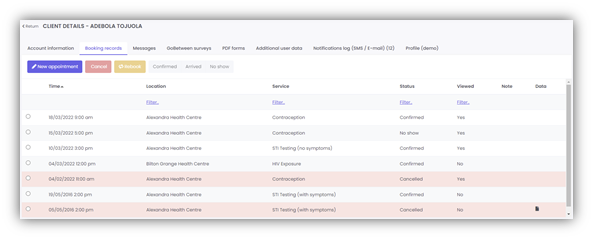
This shows a list of all past and future bookings associated with the client. For each booking, you can see the time and date, location, service, status, and the viewed status, as well as any notes or additional booking information, such as survey data collected during the booking process.
Client notes
The Client details screen consists of several tabs which allow you to view the Client Account information, Booking records, Client notes, GoBetween Messages and Surveys, PDF forms that have been assigned to them, as well as any Additional user data.
When you are happy with the note, click the Add note button and the note will be stored here until it is deleted. To delete a note, select the three dots on the right-hand side, and then select Delete on the dropdown menu.

Messages
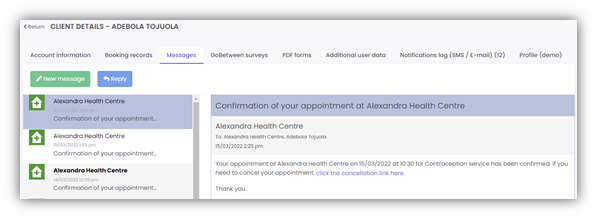
The Messages tab allows you to view all GoBetween messages that have been sent to the client. From here you can create a new message, or reply to an existing one.
GoBetween surveys
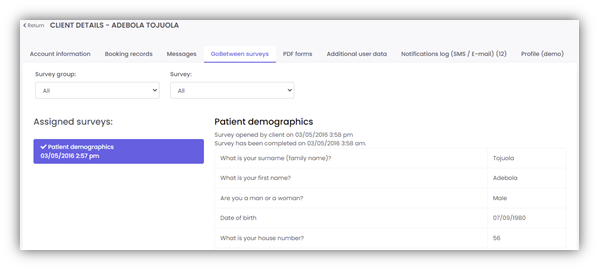
This contains a list of all GoBetween surveys that have been assigned to the client, as well as the data that has been input. From here you can easily print the survey as a PDF.
Additional user data
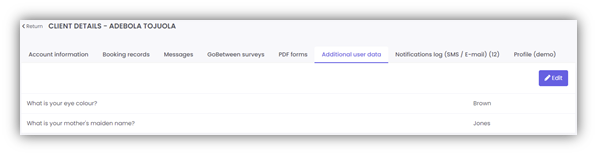
This tab contains any additional user data that is collected by your organisation as specified by your administrator.
Notifications log
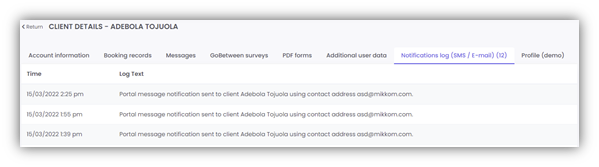
The Notifications log tab contains the history of all notifications sent to this account.
How do I edit patient details?
Firstly, search for your patient as described in How do I find an existing patient? This will take you to the Account information tab within the Client details screen. To edit the patient details, select Edit.
You can edit all fields except for the ‘created on’ and ‘modified on’ as these are created by the system.
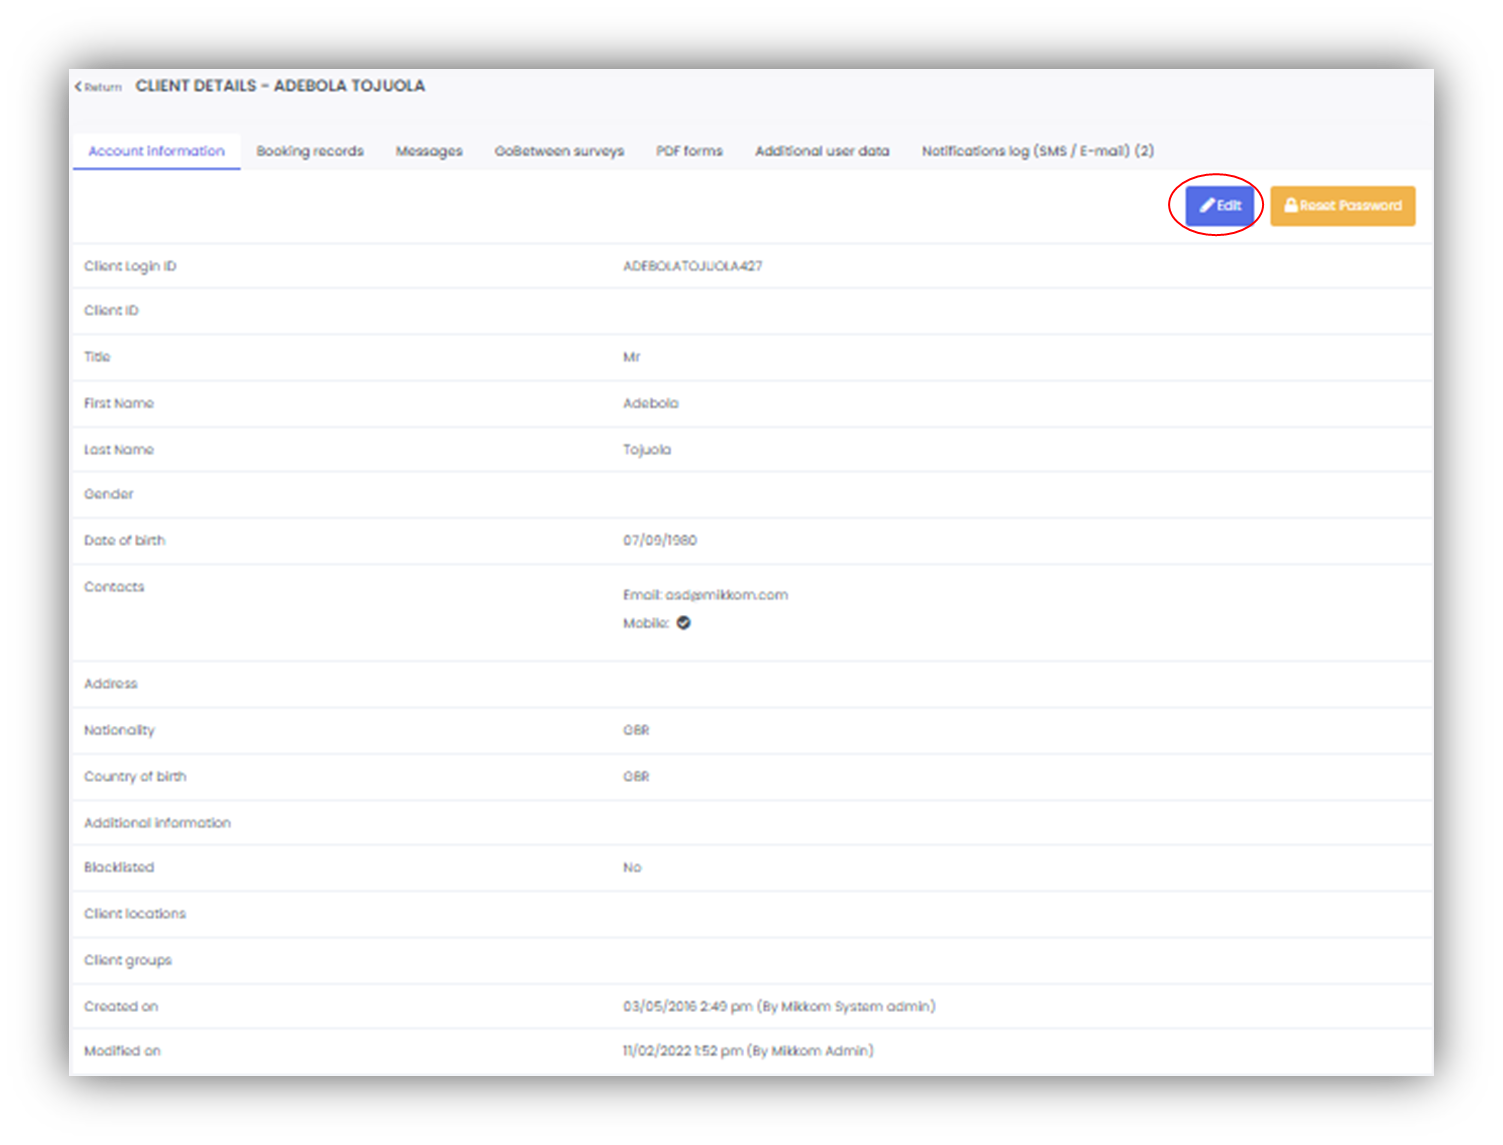
Once you have made your changes, select Save.

You can also reset the client's password using the Reset Password button. You will be asked to confirm your action before a new password is emailed to the client.

How do I create a new patient?
You can create a new client by first navigating to the Clients screen (Clients > Clients from the main Navigation Bar) and selecting Create.
On the Create client pop-up, enter:
- the first and last names of the patient
- the date of birth using the calendar pop-up (you can also free-type using the format dd/mm/yyyy)
- the gender using the drop-down option
- the patient contact details (by using the drop-down to indicate the contact type, and then inserting telephone or email address as applicable in the blank entry field).
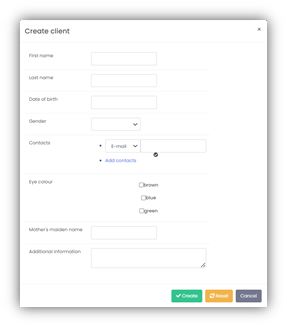
You can add further contact details by clicking on Add contacts. The first contact entered will be set as the default patient contact, to change the preferred contact method click the tick icon.
When you have completed the patient details, select Create; this will save the patient information within mCB.
Custom fields can be configured by contacting Mikkom Support, which support a variety of input types. In this example, Eye colour and Mother’s maiden name are custom fields and use checkboxes and text input respectively.
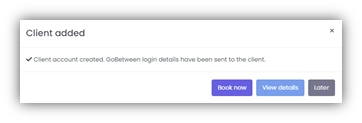
If the organisation uses GoBetween, the Login ID and password details for the patient portal will be sent via the preferred contact method (Email or SMS Text) to the patient.
After the patient information has been stored, you are given the option to book them an appointment. Selecting the Book now option will take you to the Booking records tab within the patient details screen, from where you can book them an appointment. Selecting View details will take you to the Account information screen. Selecting Later will return you to the Clients screen.
How do I delete a patient?
At the present time, it is not possible to delete Client (Patient) information from within mCB.
How do I contact a patient?
Only available to organisations not using GoBetween.
mCB will automatically notify patients about appointments that they have made (or cancelled). For more information see
How are patients notified about appointments?
Sometimes, however, it is necessary to contact a patient, for example to resend their appointment details (e.g. where they have incorrectly entered their email address online and contacted you to say they have not received their booking confirmation). In these cases, you can send a free-format message to the patient’s Email Address or Mobile Phone.
Firstly, search for your patient as described in
How do I find an existing patient? This will take you to the Account information tab within the Client details screen. After correcting the contact information (if necessary), click on the Pen Icon to the right of the contact details (Email or Mobile).
This will bring up the Send message screen. Enter your Subject text, your message and click Send.
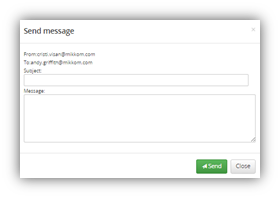
Sending messages to your patients in this manner is not secure. It is therefore recommended that you do not send confidential information (e.g. test results) to your patients in this way.
If your organisation uses GoBetween, you can send your patient a secure message using the Patient Portal; refer to the GoBetween User Guide for more information.
How are patients notified about appointments?
The Notifications function allows the mCB system to send patients a variety of messages, via email or text, using templates as a result of specific actions (such as the cancellation of an appointment).
From the Navigation Bar, select
System > Notification Templates
.
Each template is defined in the same manner, by the mCB Administrator.
There are several standard notification templates provided within mCB. These include:
- Already Booked. Sent when a client has attempted to make a booking within the appointment time search period and the appointment is already booked. Used for Text booking only.
- Booking Time. Sent when the location has certain start/end times when booking is possible and the client texts for a time outside those times. Used for Text booking only.
- Cancellation. Sent when an appointment has been cancelled.
- Contact us. Sent when the Clinic location wants the client to contact them.
- Error. Sent when there was an error in system.
- Fully booked. Sent when an appointment time is fully booked within the search period given. Used for Text booking only.
- Notification Sent. when an appointment is confirmed.
- Offer. In the future for text booking we can offer a client appointment times to choose from. The offer message is sent with offered times. Used for Text booking only (not yet implemented).
- Portal add. Sent when a client message is inserted into patient portal for the first time.
- Portal update. Sent when the client's portal was updated with a new message.
- Reminder. Sent for appointment reminders.
- Reschedule. Sent when an appointment has been rescheduled.
- Results. Sent when there is a status/result update.
- Waiting list. Sent when a patient's appointment is queuing on the waiting list. Used for Text booking only (not yet implemented).
What is the blacklist?
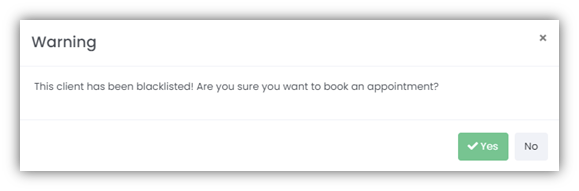
The blacklist is a way to ensure that an individual patient must contact the appointment booking centre to make their appointment, rather than using the Online or Text booking interfaces. Upon contacting the booking centre, the Clerk can speak directly with the patient, and create a booking for them (the Clerk does not need to remove the blacklist setting to make the appointment).
The booking site functionality for blacklisted patients depends on the configuration agreed between Mikkom and their customer.
When creating a booking for a blacklisted client, the Clerk will be asked to confirm their actions before proceeding.
How do I blacklist a patient?
To add a patient to the blacklist, follow the instructions as detailed in
How do I edit patient details?, and change the Blacklisted flag from No to Yes.
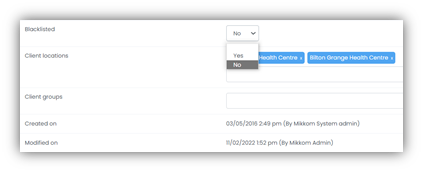
Remember, once a Patient is blacklisted, they cannot book appointments through the Online or Text interfaces and must call the appointment booking centre to do so.
How can I tell if a patient is blacklisted and remove them from the blacklist?
Navigate to
Clients > Blacklist and search for your patient via their Client Login ID or Name.
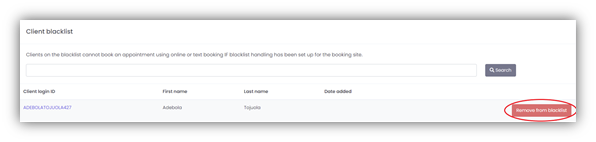
Once you have found your patient, you can remove them from the Blacklist either by editing their Client details, or select Remove from blacklist from the Client blacklist screen.
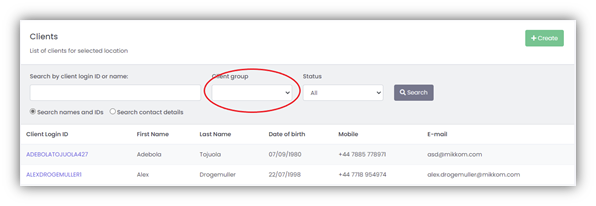
What are groups used for?
Groups are primarily used to support the Survey functionality (as utilised by GoBetween), however Groups can be used for non GoBetween functionality too. For example, you may wish to group together patients who attend a certain weekly clinic, or are participating in a drug trial etc.

When searching for a Client (patient) you can select the Client Group to help narrow down your search.
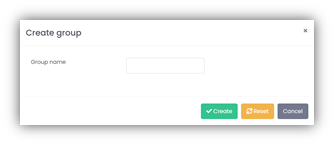
How do I create a patient group?
To create a Patient Group, navigate to
Clients > Groups, and select Add group.
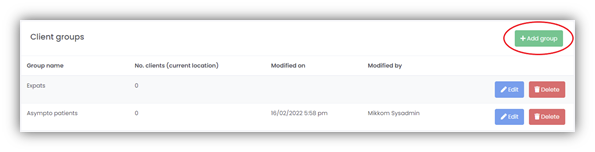
Create the Group name and select Create.
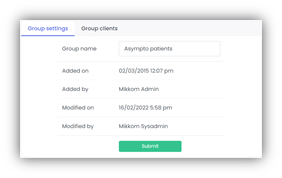
How do I edit a patient group or add patients into a group?
You can edit the name of a Patient Group, by navigating to
Clients > Groups, and selecting Edit. Once in the Edit group page, you can amend the name of the group (on the Group Setting tab) and selecting submit.
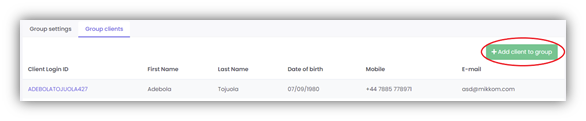
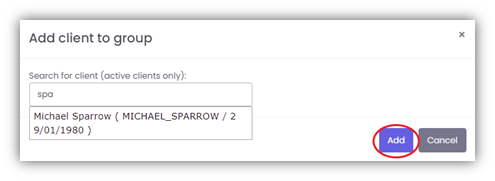
To add patients to the group, select the Group clients tab, and select Add client to group.
Within the pop-up box, start typing the name of the patient; as you type, a list of possible patients will be returned. Select the patient you wish to add to the group and select Add.